This post will guide you from the beginning of the game to how to actually play it and understand the overall gameplay as a beginner. This guide is not meant to go very deep into every topic, but to give you a clear basic understanding so that anyone can start playing the game when they first discover it.
So, let’s begin with the starting screen.
Initial Start
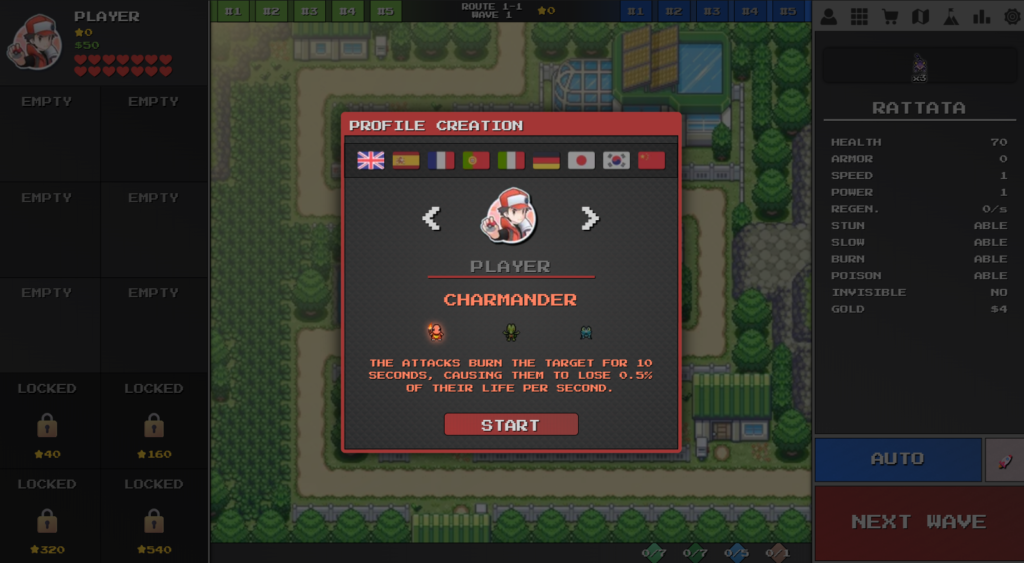
When you start the game for the first time, you will see the Profile Creation screen. This is where you enter some basic information to create your trainer card and profile. Let’s break down each part.
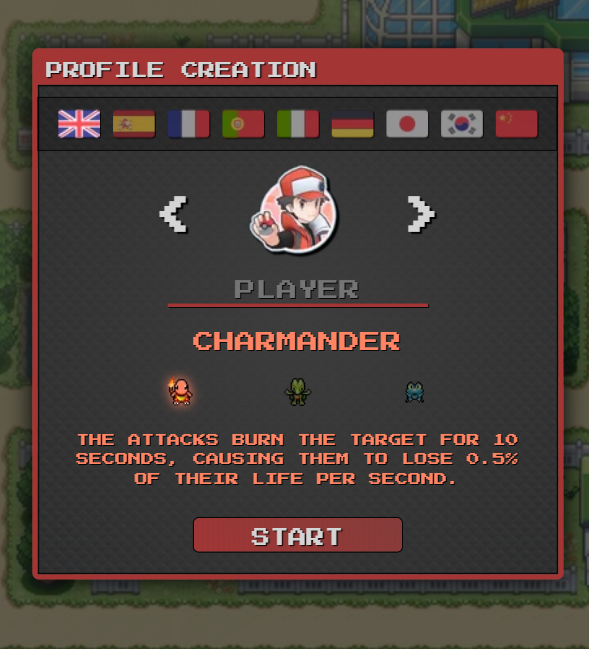
1. Language Flags
The first thing you see is a set of flags.
Each flag represents a country and its language.
- Click on a flag to change the game language
- The game uses English by default
Note: The language you choose here is not permanent. You can change it later anytime in the game, so don’t worry if you pick the wrong one.
2. Trainer Icons
In the center, you will see trainer icons with left and right arrows.
- You can choose from 20 different trainer icons
- These are based on popular Pokemon trainers
- Your chosen icon appears on your trainer card in the top-left of the screen
Note: You can change your icon later, so your first choice is not final.
3. Your Name
Below the trainer icon, you can enter your name.
- By default, it says “Player”
- Click on it and type your name
Note: Your name is also not permanent. You can change it later anytime.
4. Starter Selection
Now comes the most important part — choosing your starter Pokemon.
You can choose one by clicking on its image:
Left – Charmander
Ability: Attacks burn enemies for 10 seconds, dealing 0.5% damage per second.
Center – Treecko
Ability: Doubles its power when placed in tall grass.
Right – Froakie
Ability: Attacks bounce between enemies with reduced damage.
Important:
You cannot change your starter Pokemon after choosing it. Choose carefully.
Understanding the Game Screen
After creating your profile, you will see a short intro with 8 slides. After that, you reach the main game screen. Let’s understand each part.
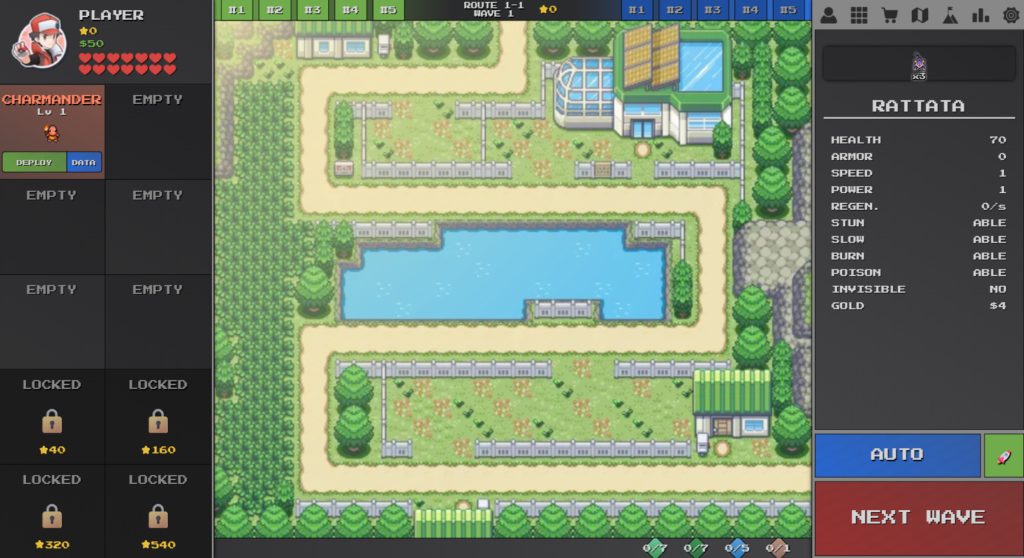
Left Side Section
1. Trainer Card
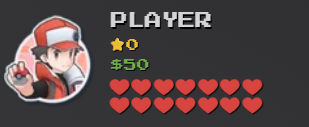
At the top-left, you see your trainer card. It shows:
- Your icon
- Your name
- Three important things:
Yellow Stars
You earn yellow stars by completing waves.
A wave is like a level. You must stop enemy Pokemon from reaching the final exit.
Each successful wave gives you 1 yellow star.
Stars are used to:
- Unlock extra team slots
- Unlock new maps
For example:
- You start with 1 map
- A new map unlocks after 10 stars
- More maps unlock at higher star counts
Money
Below the stars, you see your money.
You earn money by defeating enemy Pokemon.
Money is used to:
- Buy new Pokemon
- Buy items
- Level up Pokemon
- And more
Heart Symbol
You start with 14 hearts (lives).
- If an enemy reaches the end, you lose 1 heart
- If all hearts are gone, the map restarts from wave 0
So protect your hearts to progress further.
2. Pokemon Team
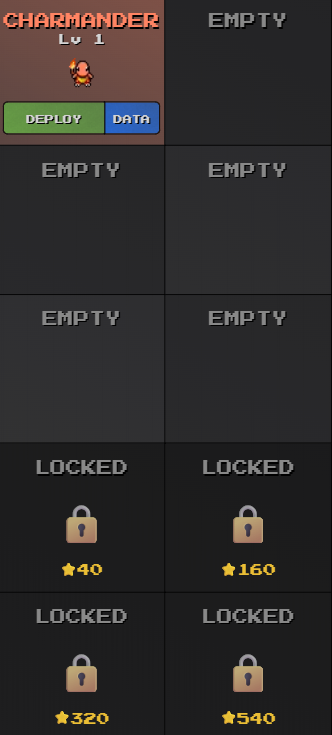
Below your trainer card is your active team.
- You can have up to 10 Pokemon
- At first, only 6 slots are open
- 4 slots are locked and unlock with yellow stars
At the start, you only have your starter.
Each Pokemon box shows:
- Name
- Level
- Deploy: Place Pokemon on the map
- Retire: Remove Pokemon from the map
- Data: Shows stats, abilities, items, evolution info, and upgrade cost
Right Side Section
Bottom Right Buttons

Auto
Auto mode sends the next wave automatically after finishing one.
Good when your team is strong and you don’t need prep time.
Next Wave
Used to manually start the next wave when Auto is off.
Rocket (Speed)
Controls game speed:
- Normal
- Fast
- Max Speed
- Then back to Normal
Use it to save time on easy waves.
Top Right Section (Tabs)

1. Profile

Shows:
- Your name and icon
- Achievements
- Time played
- Stars collected
- Highest level Pokemon
- Total Pokemon owned
- Enemies defeated
2. Team Management (PC)

Works like the PC in Pokemon games.
- Store extra Pokemon
- Swap team members
- Search and sort Pokemon
3. Shop

Buy:
- Items
- Eggs (give random Pokemon, price increases each time)
- And other more stuffs.
This is like a Pokemart.
4. Map

Shows:
- Available maps
- Stars needed to unlock new maps
- Switch between maps
Each map has different difficulty and enemies.
5. Challenges

Add special rules like:
- Permadeath
- Stronger enemies
- Limited lives
- And more options.
Use it to make the game harder.
6. Stats

Shows enemy stats like:
- HP
- Speed
- Armor
- Power
You can also choose which enemy your Pokemon should target first.
7. Settings

You can Customize:
- Sound
- Language
- Damage numbers
- Visual effects
- Game options
- And More
Center Section (Main Game Area)

This is where you play.
At the top, you see:
Map Info

- Map name (like Route 1-1)
- Current wave number
- Stars earned on that map
If you reach wave 2, you get 1 star because you finished wave 1.
Save Slots

On both sides of the map name, you see numbers.
These are position saves:
- You can save your Pokemon placements
- You get 5 save slots
- Left numbers = Save positions
- Right numbers = Load positions
This lets you quickly switch between different layouts with one click.
Very useful for hard waves and fast enemies.
Final Words
These are all the main features a beginner should know when starting the game.
Learning these basics will help you understand the game faster and enjoy it more.
We hope this guide helped you get started.
Thanks for reading, and enjoy playing PokePath TD!